Aperture and the huge difference

First of all: The Digital Picture.com has an excellent page where you can compare the sharpness of different lenses and different apertures.

But recently I did some quick tests with my 50 mm f1.4 myself. It’s a decent lens and regarded excellent for the price range. And it’s pretty fast, featuring an aperture of 1.4. But lenses loose sharpness and contrast at low apertures, and I wanted to know exactly how much. In this lens the difference is huge. Here are two 100% crops:

50 mm @ f5.6

50mm_at_56_100crop

50 mm @ f1.4

50mm_at_14_100crop

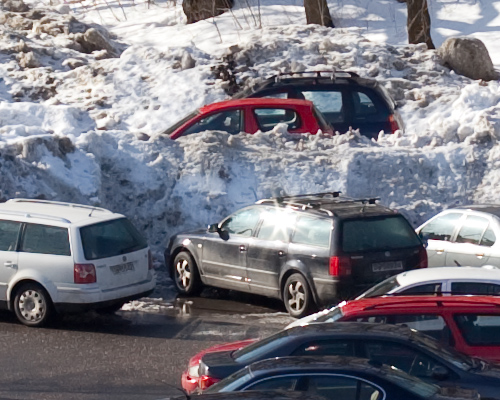
Yes. That’s the same lens, the same camera and the same conditions. Only a different aperture value. But will you see the difference if you snap an image at full resolution and reduce the size down to what you’ll need on a web page? Let’s have a look. 21 megapixels from my Canon 5D MarkII reduced down to an image that is 500 pixels wide.

50 mm @ f5.6

img_6194

50 mm @ f1.4

img_6182

And I guess you’ll need a slightly trained eye to see the difference clearly. First of all you see the vignetting: darker corners. Then you see that the DOF is more shallow and that the cars at the bottom of the image in the f1.4-version is not completely focused. This is how it should be. A shallow depth of field is one of the beauties of a low aperture value.

But if you look closely you’ll see that the overall sharpness and sense of depth in general in the f5.6-image is better. Even when the image is reduced down to this size.

So, if you want the ultimate in technical quality you should plan your aperture. And buy very nice lenses…

Aperture and the huge difference

Aperture, shutter speed and ISO – Explained visually

IMG_0008

First of all: my entry into visualization using Flash in my last article was less than perfect. Mainly because I didn’t shoot every image in my sequence with the same aperture. Meaning that the background changed because the depth of field change.

So, I’ve made a new ISO-test of the 5D Mk II. Slightly better. At least the aperture stayed at 5.6 at all ISO values. The flash file is big, and I’ve not made any kind of download indicator. So when you click the link you need some patience while the page load.

Link to: Flash animation showing ISO-change

Aperture

But what about that aperture stuff? Did you say depth of field? Yes. When you change that thing called aperture on your camera things happen to your image. To put it short: a low value, like 1.4 gives more blur in your image. A high value, like 22 gives less blur. The detail that you focus on will stay sharp, but the amount of detail around that point change.

IMG_0009

Huh? Exactly. This is easier to show with an image. Or, actually several images. In an animation like the ISO-experiment. Where you can click the row of f-numbers at the bottom and see the image change. And it’s the same as with the ISO-animation. When you click the link you have to wait a while for the page to load.

Link to: Flash animation showing aperture change

Shutter Speed

IMG_0043

But hey! I can also adjust something called “shutter speed”. Yes, in addition to ISO and aperture the shutter speed adjust the amount of light you will let in at the CMOS- or CCD-chip. And the effect on the image? A long shutter speed gives motion blur. And if you are shooting without a tripod or something to support your camera a long shutter speed mostly means a completely blurred image.

To show the difference that the shutter speed makes I did the test again. With a train moving in the image. So now you can see the effect of both the shutter speed and the aperture. And you know what? When you click the link you need patience. Let the page load…

Link to: Flash animation showing aperture and shutter speed change

But your flash animations are crap

Indeed. I haven’t coded flash since 1999 and used Apple KeyNote to make these. So, if you want to make them better I have provided you with all the original images. Full resolution:
ISO-test Originals
Aperture Test Originals
Aperture and shutter speed test Originals

These are zipped archives of the images. And please let me know in the comments if you use these images. They’re licensed under a creative commons license.

Aperture, shutter speed and ISO – Explained visually

My current image workflow

I posted my current backup strategy a while ago. And after a quick chat with Rodrigo on Twitter I decided to post my image workflow as well.

The basic flow is simple:

1. Out there
Snap images in RAW using my trusted Canon ESO 400D. I’m still very impressed with this camera. It has survived more than I could expect. Now snapping away at its image number 26 654.

It has survived drops from 1,5 meter. Heat and sand in Marrakesh and freezing snow in the mountains of Norway. I’m not changing before Canon cranks out that 21 mpix, 8 fps, weather sealed, HD-video shooting full frame 5D mark II. Yeah. I know. Rumors.

Anyway, I am using two 4 GB SanDisk Ultra II CF cards while out shooting. Then:

2. At home
Transfer the images to my 24″ iMac (a fast, beautiful, silent and in general amazing machine). I’m using the import function in Lightroom and organize the images in folders according to the date: “Main Archive”/Year/Month/Day/image files

The images are not stored on the iMac. They go to a shared drive that’s connected to the main server at home. The main server is a MacBook Pro that had an accident and ended up with a destroyed screen. It’s now permanently connected to the TV in our living room. Serving as a media hub, PVR and file storage for the family. It’s placed in a well ventilated cabinet together with a bunch of disks.

And that’s where my image files go. On to two of the disks. Set up in a mirrored RAID for redundancy.

3. The boring stuff
Tag my images as much as I have time for. Usually that boils down to a few tags describing the session, happening, place and whatever suits all images. I’m not good enough at individual tagging of my images. Too much of my archive relies on the fact that I remember when the image I am looking for was taken. Lately I’ve also started to do automatic geotagging of my images.


(This image: the ultimate cliche. Shot at Solastranden at the western coast of Norway)

4. The fun stuff
Process and edit my images. Lightroom 2 is really powerful for this. With the adjustment brush I can do wonders with an image very fast. And everything is non destructive, leaving the original RAW file untouched. The RAW files contain more information than a JPG and I’m still amazed what I can get out of even a bad shot with wrong white balance and wrong exposure.

I used Aperture for this in the beginning. But Aperture ended up useless on my 60 000+ image archive. I’ve checked, and the latest version of Aperture is way better at this. But when switching I also ended up liking the tagging work flow, editing, RAW conversion and general handling in Lightroom better.


(This image: the beautiful Steinsdalsfossen in Hardanger, Norway)

The kitschy stuff goes into Photomatix and the tricky stuff goes into Photoshop.

5. Publishing
I’m using my images in my presentations, on this blog, over at NRKbeta, on our family site, on print and even for sale. I have a lot of images on Smugmug and Flickr, but the ones I’ve sold have been directly because someone found them on my blog or through my experiment with Shutterpoint.

In general I’m pretty relaxed when it comes to people using my images. As long as it’s not stupid shops using them in commercials without asking.

The alternate workflow
When travelling I bring my MacBook Pro. I’m running Lightroom on that one as well. So, when I’m on the road my images go from the camera, into the MacBook and on to an external disk for backup as well. When back home I transfer the images from the MacBook. Keeping all the editing and metadata from Lightroom on the laptop.

Feel free to fire away questions in the comments.
My current image workflow